Making bread at home is one of the most satisfying kitchen experiences, and using an air fryer makes it even more approachable. This method produces a beautifully golden crust with a soft, airy interior, all without needing a conventional oven. Whether you are new to bread-making or refining your skills, this detailed guide will walk you through every step to ensure consistent, bakery-quality results.
Ingredients
- 2 1/4 teaspoons active dry yeast (1 standard packet)
- 1 cup warm water (about 110°F / 43°C)
- 2 tablespoons sugar
- 2 tablespoons olive oil or melted butter
- 3 cups all-purpose flour
- 1 teaspoon salt
- 1 egg (optional, for egg wash)
- 1 tablespoon milk or water (for egg wash)
- Sesame seeds or other toppings (optional)
Understanding the Process
Bread-making relies on a few key principles: activating yeast, developing gluten, allowing proper fermentation, and baking at the right temperature. The air fryer acts like a compact convection oven, circulating hot air to create a crisp crust while keeping the inside soft.
The challenge with air fryer bread is controlling heat so the outside does not brown too quickly before the inside is fully cooked. This recipe addresses that by using moderate temperatures and careful timing.
Step 1: Activating the Yeast
In a mixing bowl, combine warm water and sugar. Stir gently until the sugar dissolves.
Sprinkle the yeast over the top and let it sit for 5 to 10 minutes. The mixture should become foamy. This indicates that the yeast is active and ready to use.
If the yeast does not foam, it may be expired or the water temperature may have been too hot or too cold.
Step 2: Mixing the Dough
Add the olive oil or melted butter to the yeast mixture.
Gradually add the flour and salt, mixing with a spoon or your hands until a dough begins to form. The dough should be slightly sticky but manageable.
Transfer the dough to a lightly floured surface.
Step 3: Kneading the Dough
Knead the dough for about 8 to 10 minutes. Push it away with the heel of your hand, fold it back, and rotate slightly. Repeat this process continuously.
As you knead, the dough will become smoother and more elastic. Proper kneading develops gluten, which gives the bread its structure and chew.
If the dough is too sticky, add a small amount of flour. Avoid adding too much, as this can make the bread dense.
Step 4: First Rise (Proofing)
Place the kneaded dough in a lightly greased bowl. Cover it with a clean towel or plastic wrap.
Let it rise in a warm place for 1 to 1.5 hours, or until it doubles in size.
This step allows the yeast to ferment, producing gas that creates air pockets in the dough, resulting in a light and fluffy texture.
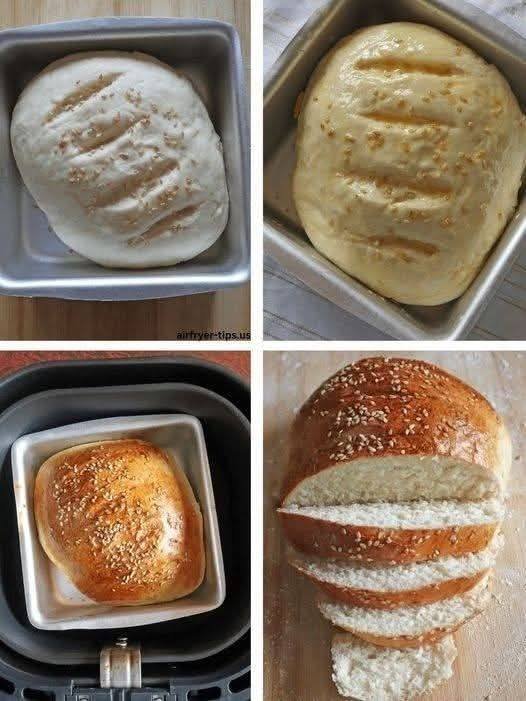
Step 5: Shaping the Dough
Once the dough has risen, punch it down gently to release excess air.
Shape it into a round or oval loaf, depending on the size and shape of your air fryer basket or baking dish. You can also place it in a small air fryer-safe pan for more structure.
Transfer the shaped dough to a parchment-lined or lightly greased dish that fits inside your air fryer.
Step 6: Second Rise
Cover the shaped dough again and let it rise for another 30 to 45 minutes. This second rise improves texture and volume.
During this time, the dough will puff up slightly and become airy.
Step 7: Preparing for Baking
If desired, brush the top of the dough with an egg wash made from one beaten egg mixed with a tablespoon of milk or water. This gives the bread a glossy, golden finish.
Sprinkle sesame seeds or other toppings on top.
Use a sharp knife to make shallow slashes on the surface. This helps control how the bread expands during baking.
Step 8: Air Frying the Bread
Preheat your air fryer to 320°F (160°C). Lower temperatures are important to ensure the bread cooks evenly without burning the outside.
Place the dough inside the air fryer basket or tray.
Bake for 15 minutes, then check the color. If it is browning too quickly, loosely cover it with foil.
Continue baking for another 10 to 15 minutes, for a total of 25 to 30 minutes.
The bread is done when:
- The crust is golden brown
- The loaf sounds hollow when tapped on the bottom
- The internal temperature reaches about 190°F to 200°F (88°C to 93°C)
Step 9: Cooling
Remove the bread from the air fryer and let it cool on a wire rack for at least 20 to 30 minutes before slicing.
Cooling allows the interior structure to set properly. Cutting too early can result in a gummy texture.
Texture and Flavor Profile
This air fryer bread has a well-balanced texture:
- A lightly crisp, golden crust
- A soft, fluffy interior with even air pockets
- A mild, slightly sweet flavor from the yeast and sugar
It is ideal for sandwiches, toast, or serving alongside soups and meals.
Tips for Success
- Use the right water temperature: Too hot can kill yeast; too cold will not activate it
- Do not rush the rises: Proper proofing is essential for fluffy bread
- Avoid overcrowding: Ensure the dough has room to expand
- Monitor closely: Air fryers vary, so check the bread during cooking
- Use foil if needed: Prevents over-browning
Variations
1. Herb Bread
Add dried herbs such as rosemary, thyme, or oregano to the dough for added flavor.
2. Garlic Bread
Mix minced garlic and a bit of butter into the dough or brush on top before baking.
3. Whole Wheat Version
Substitute part of the all-purpose flour with whole wheat flour for a denser, more nutritious loaf.
4. Sweet Bread
Increase the sugar slightly and add cinnamon or raisins for a sweeter variation.
Serving Suggestions
This bread is versatile and pairs well with many foods:
- Butter and jam for breakfast
- Sandwich fillings such as ham, cheese, or vegetables
- Soups and stews
- Dipping in olive oil or sauces
Storage and Shelf Life
Room Temperature:
Store in an airtight container or wrapped in a cloth for up to 2 days.
Refrigeration:
Not recommended, as it can dry out the bread.
Freezing:
Slice and freeze for up to 2 months. Reheat in the air fryer or toaster when needed.
Common Mistakes to Avoid
- Using inactive yeast
- Adding too much flour
- Skipping the second rise
- Cooking at too high a temperature
- Cutting the bread too soon
Conclusion
Making homemade bread in an air fryer is a rewarding and practical alternative to traditional baking. With careful attention to each step, you can achieve a loaf that is soft, fluffy, and full of flavor, with a beautifully golden crust.

- Air Fryer Cheesy Stuffed Potatoes - April 13, 2026
- Air Fryer Victoria Sponge Cake - April 13, 2026
- Chinese Chicken Cabbage Stir-Fry - April 13, 2026